Vuex 原理及源码阅读
Vuex 是为 Vue 提供的一个全局状态管理工具,它采用集中式存储管理应用的所有组件的状态,并以相应的规则保证状态以一种可预测的方式发生变化。Vuex 也集成到 Vue 的官方调试工具 devtools extension,提供了诸如零配置的 time-travel 调试、状态快照导入导出等高级调试功能。
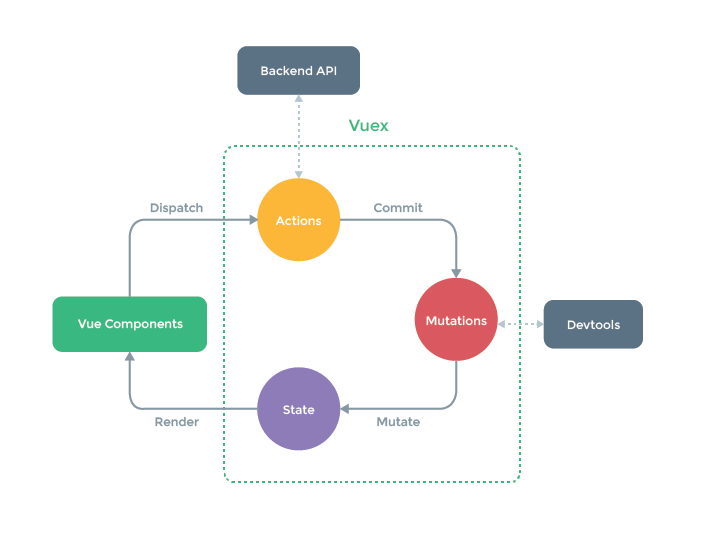
在进行源码阅读之前,先了解下 Vuex 的核心思想,下图是官网提供的流程图,概括了 Vuex 大部分的运行流程。

Vuex 里有一些核心概念,分别如下:
- Vue Components: Vue 组件,负责执行 dispatch 分发对应 actions。
- actions: 同步/异步方法执行模块。通过 dispatch 调用,主要负责向后台 API 请求的异步操作,不能直接修改 state 中的状态,而是通过 commit 提交对应的 mutation 改变状态。
- mutations:状态改变方法。每个 mutation 都有一个事件类型和一个回调函数,只能进行同步操作。
- state:状态管理容器对象。存储需要管理的各个状态数据。
- getters:图中未画出,可认为是 state 的计算属性。
- modules:Vuex 允许我们将 store 分割成模块,每个模块拥有自己的 state、mutations、actions、getters。
针对上述的核心概念,提出以下问题:
- Vuex 如何初始化?
- Store 的实例化过程?
一、初始化
使用 Vuex 只需执行
Vue.use(Vuex),并在 Vue 的配置中传入一个 store 对象的示例,store 是如何实现注入的?
1.1 导入
import Vuex from "vuex";
这是使用 Vuex 的第一步:导入 Vuex。对应在 src/index.js 中,Vuex 导出了一个对象:
// src/index.js
export default {
  Store,
  install,
  version: '__VERSION__',
  mapState,
  mapMutations,
  mapGetters,
  mapActions,
  createNamespacedHelpers,
  createLogger
}
1.2 安装
导入 Vuex 之后,我们需要通过 Vue 插件注册方式安装 Vuex:
Vue.use(Vuex);
Vue.use() 方法会调用对象(在这里也就是导入进来的 Vuex)的 install 方法。该方法定义在 src/store.js 中:
// src/store.js
export function install (_Vue) {
  if (Vue && _Vue === Vue) {
    if (__DEV__) {
      console.error(
        '[vuex] already installed. Vue.use(Vuex) should be called only once.'
      )
    }
    return
  }
  Vue = _Vue
  applyMixin(Vue)
}
install 的逻辑很简单,若是首次加载,将局部 Vue 变量赋值为全局的 Vue 对象,并执行 applyMixin 方法,它的定义在 src/mixin.js 中:
// src/mixin.js
export default function (Vue) {
  const version = Number(Vue.version.split('.')[0])

  if (version >= 2) {
    Vue.mixin({ beforeCreate: vuexInit })
  } else {
    // override init and inject vuex init procedure
    // for 1.x backwards compatibility.
    const _init = Vue.prototype._init
    Vue.prototype._init = function (options = {}) {
      options.init = options.init
        ? [vuexInit].concat(options.init)
        : vuexInit
      _init.call(this, options)
    }
  }

  /**
   * Vuex init hook, injected into each instances init hooks list.
   */

  function vuexInit () {
    const options = this.$options
    // store injection
    if (options.store) {
      this.$store = typeof options.store === 'function'
        ? options.store()
        : options.store
    } else if (options.parent && options.parent.$store) {
      this.$store = options.parent.$store
    }
  }
}
这里首先对 Vue 版本做了判断。这里只讨论 @2.x 版本,它实际是在全局混入了一个 beforeCreate 钩子函数,就是把 options.store 保留在所有组件的 this.$store 中。
这就是为什么我们在项目中只有给 main.js 文件提供 store 选项后,才能在项目中使用 this.$store 访问全局状态。
// main.js
import Vue from 'vue'
import App from './../pages/app.vue'
import store from './store.js'

new Vue({
  el: '#root',
  store,  // vuex 内部的 install 方法会将 store 赋值给所有组件的 this.$store
  render: h => h(App)
})
到这里为止,Vuex 的初始化已经完成了,接下来看看 Store 是如何实例化的。
二、Store 实例化
2.1 构建模块树
Vuex 允许我们将 store 分割成模块,每个模块拥有自己的 state、mutations、actions、getters。模块收集的代码如下:
// src/store.js
this._modules = new ModuleCollection(options)
下面来看看 ModuleCollection 里的具体逻辑:
// src/module/module-collection.js
export default class ModuleCollection {
  constructor (rawRootModule) {
    // register root module (Vuex.Store options)
    this.register([], rawRootModule, false)
  }

  get (path) {
    return path.reduce((module, key) => {
      return module.getChild(key)
    }, this.root)
  }

	...

  register (path, rawModule, runtime = true) {
    if (__DEV__) {
      assertRawModule(path, rawModule)
    }

    const newModule = new Module(rawModule, runtime)
    if (path.length === 0) {
      this.root = newModule
    } else {
      const parent = this.get(path.slice(0, -1))
      parent.addChild(path[path.length - 1], newModule)
    }

    // register nested modules
    if (rawModule.modules) {
      forEachValue(rawModule.modules, (rawChildModule, key) => {
        this.register(path.concat(key), rawChildModule, runtime)
      })
    }
  }

	...
}
这里会判断是否有 modules 选项,若有,则会递归调用 this.register 函数构建 module 树。具体过程如下:
- 首先将整个 options 设置为根模块。
- 若存在
modules选项,则递归调用this.register函数。 - 根据路径获取到父模块,然后调用父模块的
addChild方法建立父子关系。 - 再次回到第二步,依次循环,直到所有节点遍历完成。
接下来会将根模块赋值为 state,代码如下:
// src/store.js
const state = this._modules.root.state
而 addChild 会将 modules 内的键名赋值为对应模块:
addChild (key, module) {
  this._children[key] = module
}
因此我们想要调用子模块,需要这样操作:
const moduleA = { ... }
const moduleB = { ... }

const store = new Vuex.Store({
  modules: {
    a: moduleA,
    b: moduleB
  }
})

store.state.a // -> moduleA 的状态
store.state.b // -> moduleB 的状态
2.2 安装模块
构建完模块树后,需要对各个模块中的 state、getters、mutations、actions 初始化。
// src/store.js

// init root module.
// this also recursively registers all sub-modules
// and collects all module getters inside this._wrappedGetters
installModule(this, state, [], this._modules.root)