Prisma 入门
以关系型数据库 Mysql 为例,介绍 Prisma 在 Node.js 和 Typescript 项目中的安装和使用。
前置条件
安装项目
创建项目目录:
mkdir hello-prisma
cd hello-prisma
初始化 Typescript 项目并安装 Prisma CLI:
npm init -y
npm install prisma typescript tsx @types/node --save-dev
这会创建 package.json 文件,并创建一个 Typescript 项目。
接下来,初始化 Typescript:
npx tsc --init
你现在可以通过 npx 运行 Prisma CLI:
npx prisma
接下来,你可以通过创建 Prisma Schema 文件来创建 Prisma ORM 项目:
npx prisma init
这个命令做了两件事:
- 创建一个名为
prisma的目录,其中包含一个名为schema.prisma的文件,该文件包含数据库连接变量和 schema 模型。 - 在项目根目录中创建
.env文件,用于定义环境变量(例如数据库连接)。
连接数据库
为了连接数据库,你需要在 schema.prisma 文件中定义数据源:
prisma/schema.prisma
datasource db {
  provider = "mysql"
  url      = env("DATABASE_URL")
}
.env
DATABASE_URL="mysql://johndoe:randompassword@localhost:3306/mydb"
URL 格式取决于你使用的数据库。对于 MySQL,它看起来如下(大写的部分是你的特定连接细节的占位符):
mysql://USER:PASSWORD@HOST:PORT/DATABASE
这里是对每个组件的简要解释:
- USER: 数据库用户名
- PASSWORD: 数据库用户密码
- PORT: 数据库服务器运行的端口(通常为 3306 用于 MySQL)
- DATABASE: 数据库名称
Prisma Migrate
Prisma Migrate 是 Prisma 的迁移工具,用于管理数据库 schema 的变更。
prisma/schema.prisma
model Post {
  id        Int      @id @default(autoincrement())
  createdAt DateTime @default(now())
  updatedAt DateTime @updatedAt
  title     String   @db.VarChar(255)
  content   String?
  published Boolean  @default(false)
  author    User     @relation(fields: [authorId], references: [id])
  authorId  Int
}

model Profile {
  id     Int     @id @default(autoincrement())
  bio    String?
  user   User    @relation(fields: [userId], references: [id])
  userId Int     @unique
}

model User {
  id      Int      @id @default(autoincrement())
  email   String   @unique
  name    String?
  posts   Post[]
  profile Profile?
}
为了将 schema 转换为数据库,你需要运行 Prisma Migrate:
npx prisma migrate --name init
这个命令会做两件事:
- 创建一个 SQL 迁移文件。
- 在数据库中执行对应的 SQL 迁移文件。
注
注意:默认情况下,运行 prisma migrate dev 后,会在引擎盖下调用 generate。 如果模式中定义了 prisma-client-js 生成器,它会检查 @prisma/client 是否已安装,如果缺少,则安装。
安装 Prisma Client
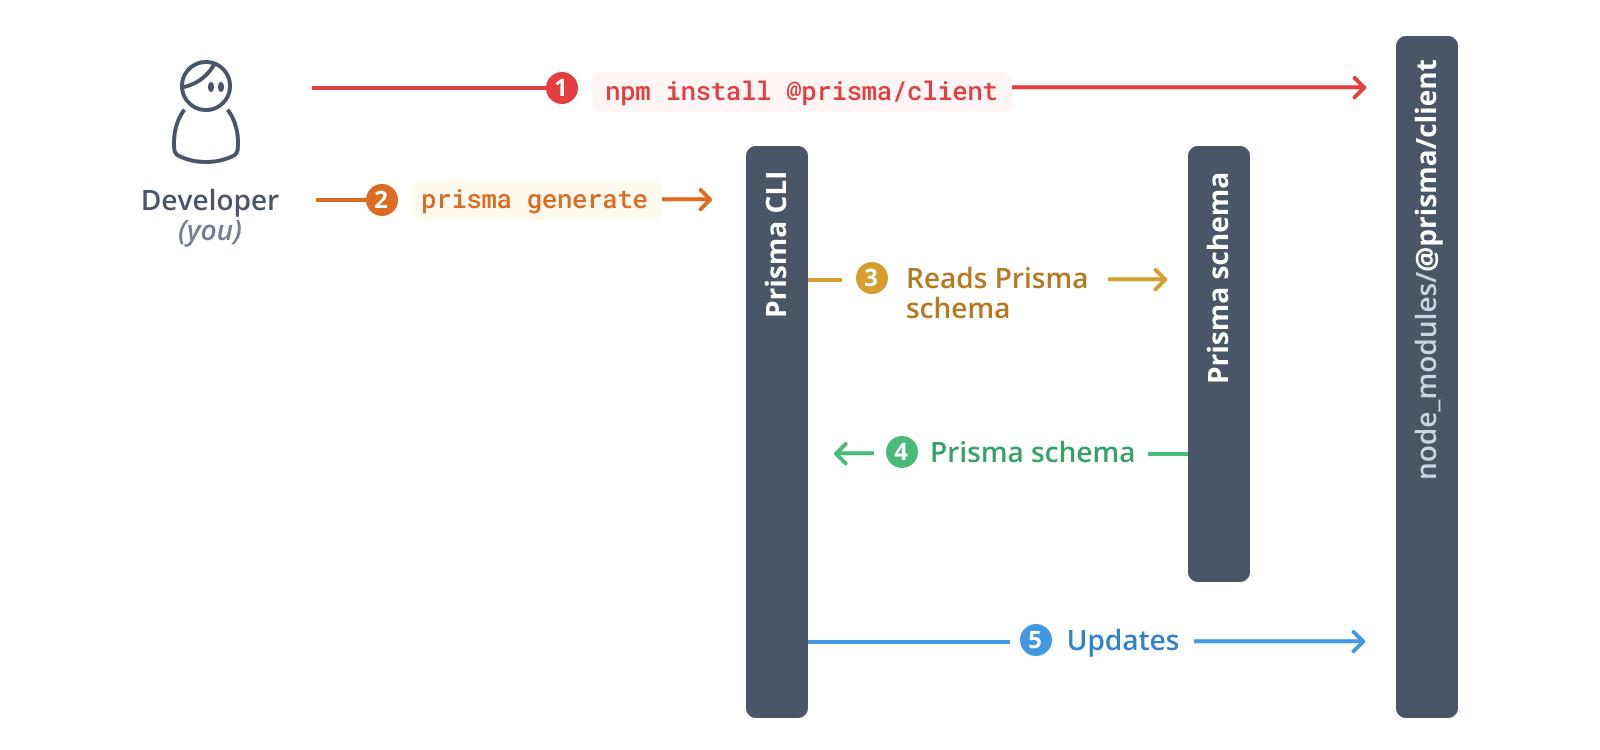
要开始使用 Prisma 客户端,需要安装 @prisma/client 软件包:
npm install @prisma/client
安装命令会调用 prisma generate,读取 Prisma schema 并生成适合你模型的 Prisma 客户端版本。

无论何时更新 Prisma schema,都必须使用 prisma migrate dev 或 prisma db push 更新数据库模式。这将使数据库模式与 Prisma 模式保持同步。这些命令还将重新生成 Prisma 客户端。
[!WARNING] >
prisma db push不会生成迁移文件,只会在数据库中执行对应的 SQL 语句。因此如果你需要对数据库进行版本控制,需要更好的迁移记录和管理,请使用
prisma migrate dev。
操作数据库
查询数据
现在已经生成了 Prisma Client,可以开始编写在数据库中读写数据的查询。
创建一个名为 index.ts 的新文件,并在其中添加以下代码:
import { PrismaClient } from '@prisma/client'

const prisma = new PrismaClient()

async function main() {
  // ... you will write your Prisma Client queries here
}

main()
  .then(async () => {
    await prisma.$disconnect()
  })
  .catch(async (e) => {
    console.error(e)
    await prisma.$disconnect()
    process.exit(1)
  })
以下是代码片段各部分的简要概述:
- 从
@prisma/client节点模块导入PrismaClient构造函数 - 实例化
PrismaClient - 定义名为
main的异步函数,向数据库发送查询 - 调用
main函数 - 脚本终止时关闭数据库连接
在 main 函数中,添加以下查询,从数据库中读取所有用户记录并打印结果:
async function main() {
  // ... you will write your Prisma Client queries here
  const allUsers = await prisma.user.findMany()
  console.log(allUsers)
}
运行脚本:
npx tsx index.ts
这将打印一个空数组,因为数据库中还没有用户记录:
[]
写入数据
findMany 查询只能从数据库中读取数据(尽管它仍然是空的)。接下来可以向 Post 表和 User 表中写入新记录。
调整 main 函数,向数据库发送创建查询:
async function main() {
  await prisma.user.create({
    data: {
      name: 'Alice',
      email: 'alice@prisma.io',
      posts: {
        create: { title: 'Hello World' }
      },
      profile: {
        create: { bio: 'I like turtles' }
      }
    }
  })

  const allUsers = await prisma.user.findMany({
    include: {
      posts: true,
      profile: true
    }
  })
  console.dir(allUsers, { depth: null })
}
这段代码使用 嵌套写查询 创建了一条新的用户记录以及新的帖子和简介记录。用户记录分别通过 Post.author ↔ User.posts 和 Profile.user ↔ User.profile 关系字段与其他两条记录创建 关系。
请注意,您向 findMany 传递了 include 选项,该选项告诉 Prisma 客户端在返回的用户对象中包含 posts 和 profile 关系。
运行脚本:
npx tsx index.ts
这将打印一个包含新创建的用户的数组:
[
  {
    email: 'alice@prisma.io',
    id: 1,
    name: 'Alice',
    posts: [
      {
        content: null,
        createdAt: 2020-03-21T16:45:01.246Z,
        updatedAt: 2020-03-21T16:45:01.246Z,
        id: 1,
        published: false,
        title: 'Hello World',
        authorId: 1,
      }
    ],
    profile: {
      bio: 'I like turtles',
      id: 1,
      userId: 1,
    }
  }
]
这个 query 向 User 和 Post 表中写入了新记录:
User
| id | name | |
|---|---|---|
| 1 | alice@prisma.io | Alice |
Post
| id | createdAt | updatedAt | title | content | published | authorId |
|---|---|---|---|---|---|---|
| 1 | 2020-03-21T16:45:01.246Z | 2020-03-21T16:45:01.246Z | Hello World | null | false | 1 |
Profile
| id | bio | userId |
|---|---|---|
| 1 | I like turtles | 1 |
提示
你可以通过 npx prisma studio 启动 Prisma Studio,查看数据库中的数据。
总结
通过以上步骤,你已经了解了如何使用 Prisma 在 Node.js 和 Typescript 项目中连接数据库、查询数据和写入数据,并使用 Prisma Studio 查看数据库中的数据。