Vite 初体验
通过前面对 webpack 的学习,我们已经看到了它的强大,为什么还需要学习 Vite 呢?
Vite 官方文档中提到,当我们开始构建越来越大型的应用时,需要处理的 JavaScript 代码量也呈指数级增长。包含数千个模块的大型项目相当普遍。我们开始遇到性能瓶颈 —— 使用 JavaScript 开发的工具通常需要很长时间(甚至是几分钟!)才能启动开发服务器,即使使用 HMR,文件修改后的效果也需要几秒钟才能在浏览器中反映出来。如此循环往复,迟钝的反馈会极大地影响开发者的开发效率和幸福感。
事实也确实如此,webpack 虽好,但是每次重新打包或者热更新都需要比较长的时间,同时还需要繁琐的配置,每次使用 loader 或者 plugin 都需要写上配置文件。
Vite 给我们提供了开箱即用的配置,同时它也具有高度的可扩展性,并有完整的类型支持。它主要由两部分组成:
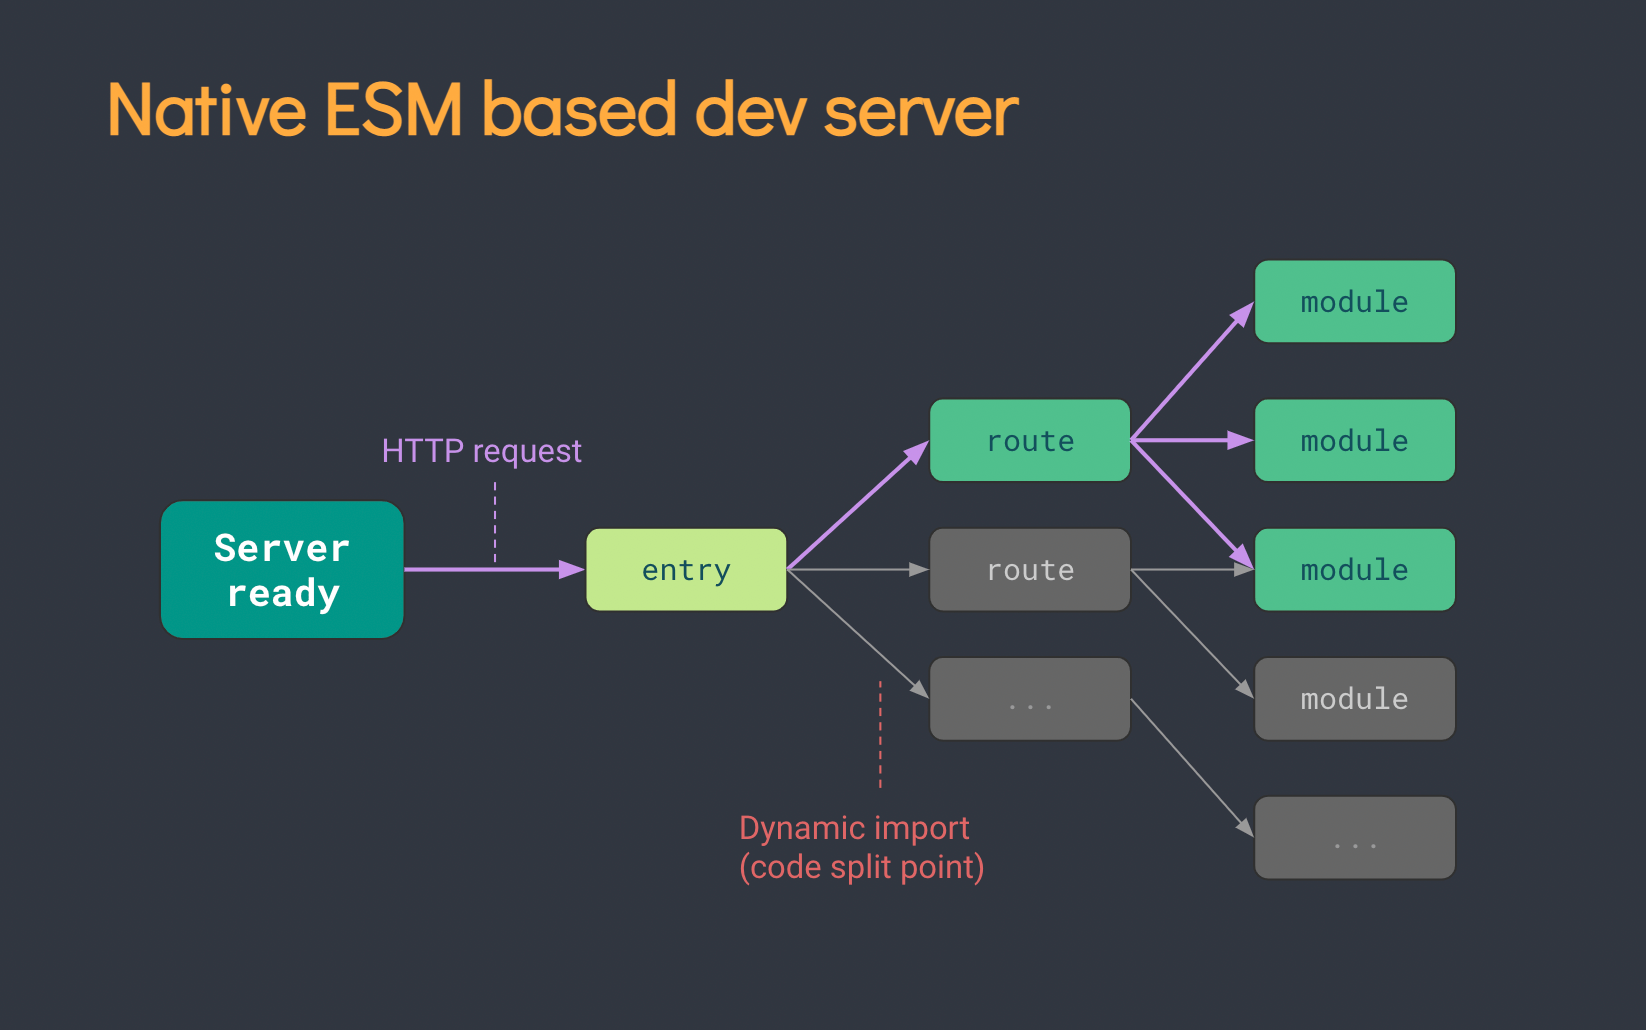
- 一个开发服务器,它基于原生 ES 模块提供了丰富的内建功能,如速度快到惊人的模块热更新(HMR)。
- 一套构建指令,它使用 Rollup 打包你的代码,并且它是预配置的,可输出用于生产环境的高度优化过的静态资源。
开始
新建项目,初始化 npm,然后本地安装 vite。
mkdir vite-demo
cd vite-demo
npm init -y
npm install vite -D
创建以下目录及文件:
project
  vite-demo
  |- package.json
  |- package-lock.json
+ |- index.html
+ |- /src
+   |- /js
+     |- math.js
+   |- index.js
src/js/math.js
export function sum(num1, num2) {
  return num1 + num2;
}
src/index.js
import { sum } from "./js/math.js";

console.log("Hello Vite!");
console.log(sum(10, 20));
index.html
<!DOCTYPE html>
<html lang="en">
<head>
  <meta charset="UTF-8">
  <meta http-equiv="X-UA-Compatible" content="IE=edge">
  <meta name="viewport" content="width=device-width, initial-scale=1.0">
  <title>vite-demo</title>
</head>
<body>
  <script src="./src/index.js" type="module"></script>
</body>
</html>
现在用 live server 打开 index.html 文件,即可看到浏览器显示正确的内容:
Hello Vite!
30
但其实我们现在并没有使用 Vite 帮我们打包项目,它起作用的原因在于浏览器本身就支持原生 ES 模块。既然这样,我们直接写 ES Module 的代码就行,为什么还需要使用到 Vite 呢?接下来看看直接使用 ES Module 的问题所在。
原生 ES 模块的问题
为了体现原生 ES 模块的问题,安装 lodash-es 库,它是使用 ES Module 导出的。
npm install lodash-es
接下来在 src/index.js 中使用:
+ import _ from "lodash-es";

  import { sum } from "./js/math.js";

  console.log("Hello Vite!");
  console.log(sum(10, 20));
+ console.log(_.join(["hello", "vite"], "-"));
这时打开 index.html 会报错:
Uncaught TypeError: Failed to resolve module specifier "lodash-es". Relative references must start with either "/", "./", or "../".
之前在 webpack 中可以直接这样导入模块的原因是它内部帮我们做了模块解析。其实 Vite 也帮我们做了这样的事,但是为了体现原生 ES Module存在的问题,使用相对路径对其进行导入。
- import _ from "lodash-es";
+ import _ from "../node_modules/lodash-es/lodash.default.js";
重新打开浏览器正常工作:
Hello Vite!
30
hello-vite
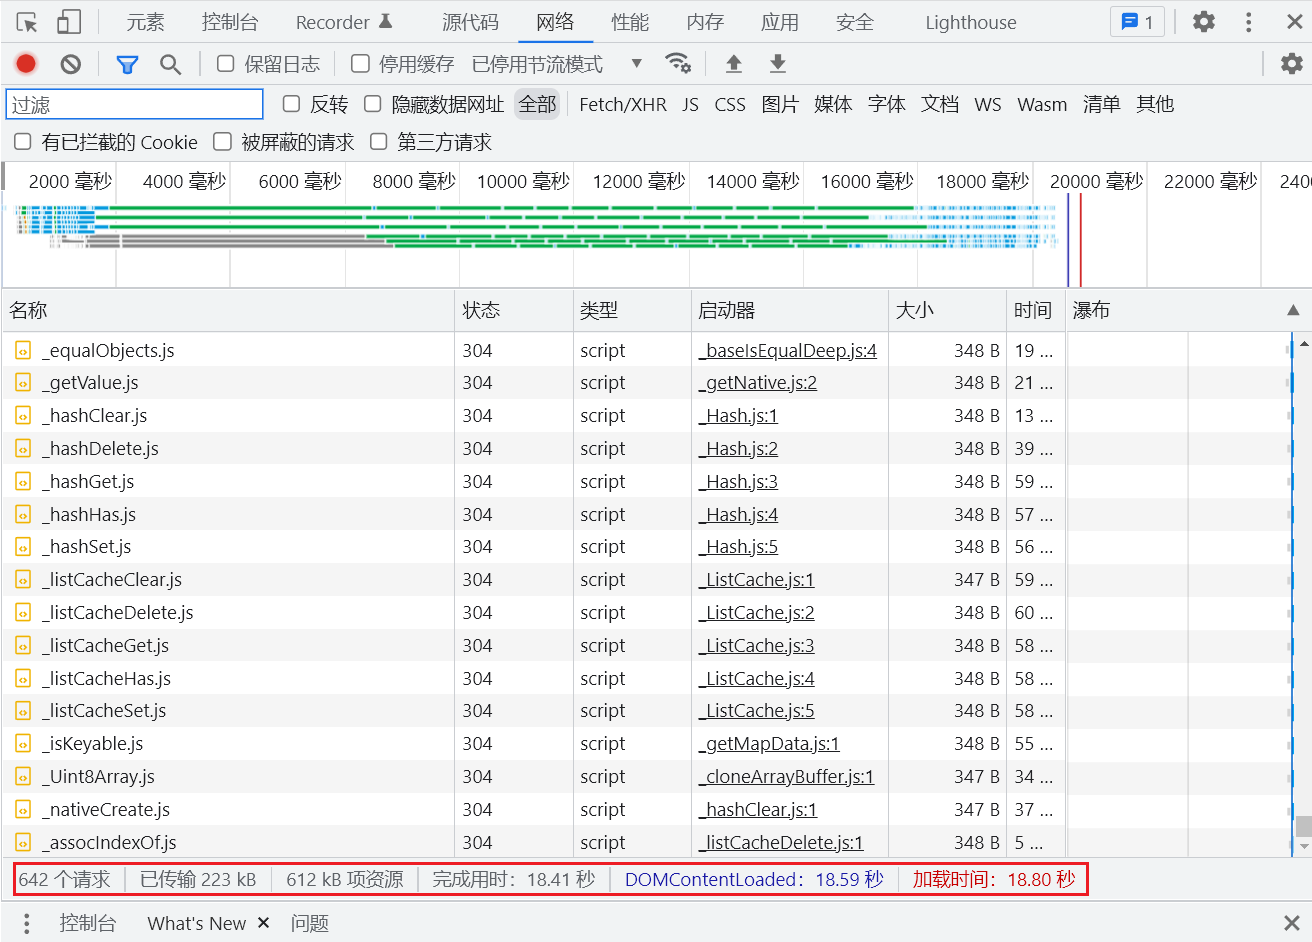
但是,我们查看网络,可以看到浏览器将整个库都请求下来了,如果每个库都这样,那请求的资源将不可想象。

现在我们更改下模块路径,并使用 vite 启动服务:
src/index.js
- import _ from "../node_modules/lodash-es/lodash.default.js";
+ import _ from "lodash-es";
npx vite

vite v2.9.9 dev server running at:

> Local: http://localhost:3000/
> Network: use `--host` to expose

ready in 547ms.
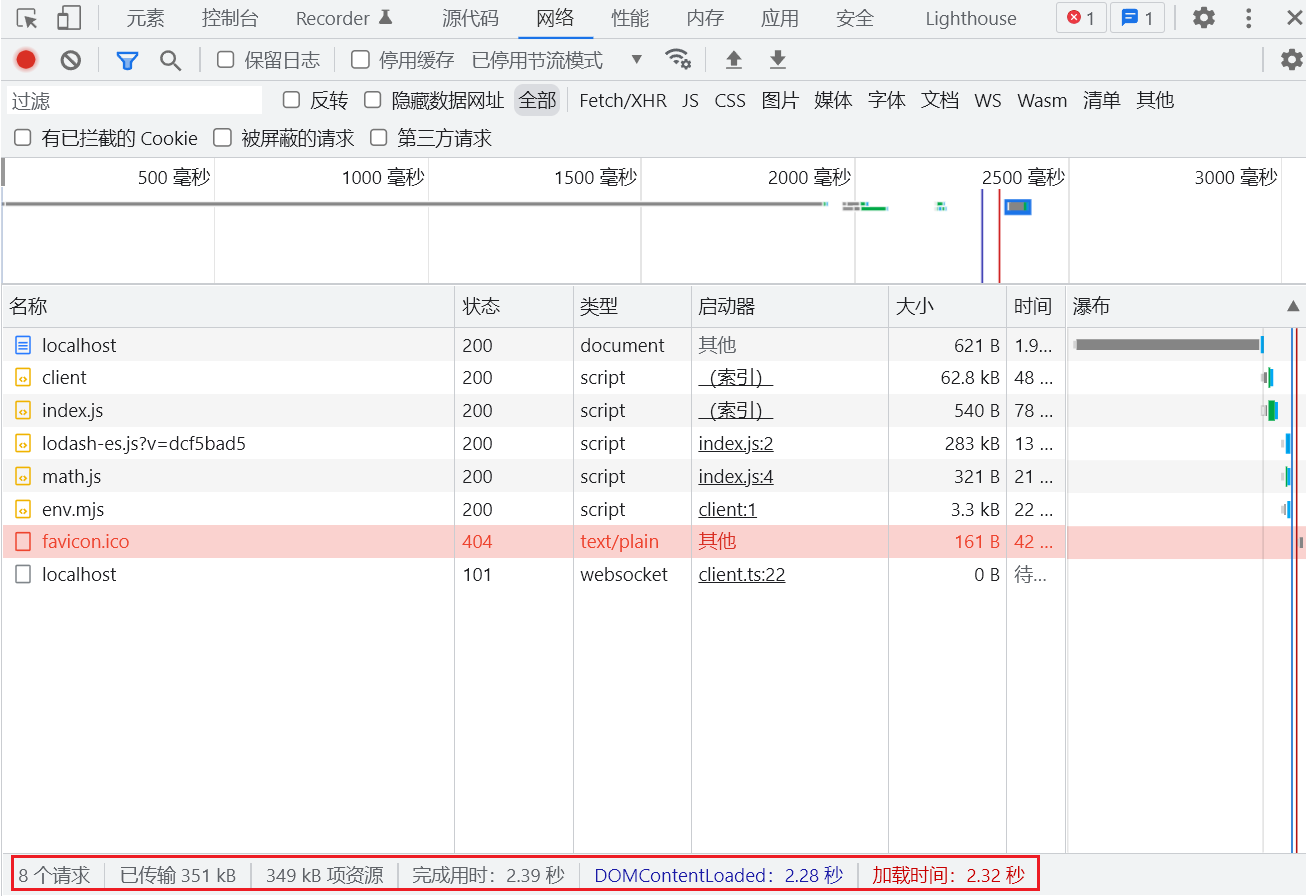
用浏览器打开并查看网络,请求数极大减少,这是由于 Vite 帮我们在内部做了处理。

css
普通 css
导入 .css 文件将会把内容插入到 <style> 标签中,同时也带有 HMR 支持。
在 src 下新建 css 文件夹,并新增 style.css 文件:
src/css/style.css
body {
  background-color: #eee;
}
src/index.js
  import _ from "lodash-es";
  import { sum } from "./js/math.js";

+ import "./css/style.css";

  console.log("Hello Vite!");
  console.log(sum(10, 20));
  console.log(_.join(["hello", "vite"], "-"));
打开浏览器可以看到 .css 样式生效。
预处理器
Vite 也同时提供了对 .scss, .sass, .less, .styl 和 .stylus 文件的内置支持。没有必要为它们安装特定的 Vite 插件,但必须安装相应的预处理器依赖:
# .scss and .sass
npm add -D sass

# .less
npm add -D less

# .styl and .stylus
npm add -D stylus
以 less 为例,在 src/css 文件夹下新建 title.less 文件:
title.less
@fontSize: 50px;
@fontColor: #999;

.title {
  font-size: @fontSize;
  color: @fontColor;

  user-select: none;
}
src/index.js
  import _ from "lodash-es";
  import { sum } from "./js/math.js";

  import "./css/style.css";
+ import "./css/title.less";

  console.log("Hello Vite!");
  console.log(sum(10, 20));
  console.log(_.join(["hello", "vite"], "-"));

+ const titleEl = document.createElement('div');
+ titleEl.className = "title";
+ titleEl.innerHTML = "Hello Vite";

+ document.body.appendChild(titleEl);
打开浏览器可以看到 .less 样式生效。
postcss
如果项目包含有效的 PostCSS 配置 (任何受 postcss-load-config 支持的格式,例如 postcss.config.js),它将会自动应用于所有已导入的 CSS。
首先安装 postcss 和 postcss-preset-env:
npm install postcss postcss-preset-env -D
在项目根目录下新建 postcss.config.js:
postcss.config.js
module.exports = {
  plugins: [
    require("postcss-preset-env")
  ]
}
这时候打开浏览器查看元素,可以发现已经帮助我们加上了前缀:
.title {
  font-size: 50px;
  color: #999;
  -webkit-user-select: none;
     -moz-user-select: none;
      -ms-user-select: none;
          user-select: none;
}
图片
在 src 下新建 img 文件夹,并修改 index.js 文件:
index.js
  import _ from "lodash-es";
  import { sum } from "./js/math.js";

  import "./css/style.css";
  import "./css/title.less";

+ import avatarUrl from "./img/avatar.png";

  console.log("Hello Vite!");
  console.log(sum(10, 20));
  console.log(_.join(["hello", "vite"], "-"));

  const titleEl = document.createElement('div');
  titleEl.className = "title";
  titleEl.innerHTML = "Hello Vite";

+ const imgEl = document.createElement('img');
+ imgEl.src = avatarUrl;

  document.body.appendChild(titleEl);
+ document.body.appendChild(imgEl);
不用其他配置,浏览器就已经显示出了图片。
TypeScript
Vite 使用 esbuild 将 TypeScript 转译到 JavaScript,约是 tsc 速度的 20~30 倍,同时 HMR 更新反映到浏览器的时间小于 50ms。
src 下新建 ts 文件夹,并新增 mul.ts 文件,在 index.js 下使用:
src/ts/mul.ts
export default function(num1: number, num2: number): number {
  return num1 * num2;
}
src/index.js
  import _ from "lodash-es";
  import { sum } from "./js/math.js";
+ import mul from "./ts/mul.ts";

  import "./css/style.css";
  import "./css/title.less";

  import avatarUrl from "./img/avatar.png";

  console.log("Hello Vite!");
  console.log(sum(10, 20));
  console.log(_.join(["hello", "vite"], "-"));
+ console.log(mul(10, 20));

  const titleEl = document.createElement('div');
  titleEl.className = "title";
  titleEl.innerHTML = "Hello Vite";

  const imgEl = document.createElement('img');
  imgEl.src = avatarUrl;

  document.body.appendChild(titleEl);
  document.body.appendChild(imgEl);
浏览器正确的打印了 200。
Vue
Vite 为 Vue 提供第一优先级支持:
- Vue 3 单文件组件支持:@vitejs/plugin-vue
- Vue 3 JSX 支持:@vitejs/plugin-vue-jsx
- Vue 2 支持:underfin/vite-plugin-vue2
首先安装 vue@next 和 @vitejs/plugin-vue:
npm install vue@next @vitejs/plugin-vue -D
接下来对项目文件进行修改:
index.html
 <!DOCTYPE html>
 <html lang="en">
 <head>
   <meta charset="UTF-8">
   <meta http-equiv="X-UA-Compatible" content="IE=edge">
   <meta name="viewport" content="width=device-width, initial-scale=1.0">
   <title>vite-demo</title>
 </head>
 <body>
+  <div id="app"></div>
   <script src="./src/index.js" type="module"></script>
 </body>
</html>
src/vue/App.vue
<template>
  <div>
    <h2>{{message}}</h2>
  </div>
</template>

<script>
  export default {
    data() {
      return {
        message: "Hello Vue"
      }
    }
  }
</script>

<style scoped>
</style>
src/index.js
+ import { createApp } from "vue";
+ import App from './vue/App.vue';

  ...

+ createApp(App).mount('#app');
新建 vite.config.js 使用 @vitejs/plugin-vue 来处理 .vue 文件:
vite.config.js
const vue = require('@vitejs/plugin-vue')

module.exports = {
  plugins: [
    vue()
  ]
}
npm script
package.json
  "scripts": {
    "test": "echo \"Error: no test specified\" && exit 1",
+   "serve": "vite",
+   "build": "vite build",
+   "preview": "vite preview"
  },
vite:启动服务。vite build:给项目进行打包。vite preview:打包后进行预览。
在进行
npm run build打包后使用live server打开后页面显示空白,浏览器报错。需要在vite.config.js下配置base: './'。
总结
通过上面的体验,可以发现 Vite 是真的很快,而且不需要像 webpack 那样大量的配置。
以前的打包模式,项目启动时,需要先将所有文件打包成一个文件 bundle.js ,然后在 html 引入,这个 多文件 -> bundle.js 的过程是非常耗时间的。

而 Vite 以原生 ESM 方式提供源码,Vite 只需要在浏览器请求源码时进行转换并按需提供源码。根据情景动态导入代码,即只在当前屏幕上实际使用时才会被处理。
